Chiasmus occurs in a work of art when the first half of a story mirrors the second half in minute detail. So a chiasmus begins and ends in the same way, and it reaches a crucial turning point in the middle. It can be words in scripture or events in film. And today we are going to show how Quigley Down Under is an example of Cinematic Chiasmus!
The Chiasmus
This is the first time I’ve analyzed a Western in this way (unless you count Back to the Future Part III), and I’m glad it’s Quigley Down Under because that’s among my favorite films. Check out the incredible symmetry of this film as its events unfold.
A. Matthew Quigley travels to Australia
B. Crazy Cora calls Quigley Roy while he fights a bunch of goons
C. Cora tries to bandage Quigley’s head, but he asks her to leave him alone
D. Quigley meets Major Ashley-Pitt and his men
E. Quigley declines Cora’s offer of her body
F. Quigley meets Elliott Marston, and they both show off their shooting skills
G. Quigley throws Marston out of his own house
H. Marston’s aborigine servant takes Quigley by surprise
I. Quigley kills two of Marston’s men, one with his rifle
J. Quigley and Cora wander aimlessly in search of water
K. The major brings two dead bodies to Marston’s ranch
L. Aborigines come across Quigley and Cora and save them
M. Quigley and Cora share their skills with the aborigines as a reward for saving their lives
N. Cora tells Quigley about the Comanches and notes that her husband never looked back as he walked away
O. Quigley wakes up before Cora, and the aborigines are already gone
P. Quigley defends the aborigines from Marston’s men, and a little girl Cora loved dies in the battle
Q. Cora gives mixed signals, referring to Quigley as Roy at night and then Matthew Quigley the next morning
R. Marston’s man returns to the ranch, bringing word that Quigley killed the others
S. Quigley takes revenge on Marston’s men for pushing aborigines off a cliff
T. Cora runs to the dead aborigines while Quigley gets information from a wounded man
U. Cora finds a crying baby who managed to survive among the dead aborigines
V. Quigley leaves Cora in a cave so he can race to the nearest town for help
W. Quigley comes into town and gets help from a kind general store owner and his wife. The owner’s son Klaus is asked to get Quigley’s horse
W. A couple of Marston’s men come out of a saloon and spot Klaus leading Quigley’s horse. They demand he reveal where it came from
V. Cora tries to soothe the baby in the cave by telling him, “Daddy will be home soon”
U. Cora defends the crying baby from deadly dingoes
T. Quigley kills most of Marston’s men and wounds the last one, while the kindly man’s wife is killed in the battle
S. Quigley tells Marston’s man to inform Marston he’s coming to take revenge on him
R. Marston’s man returns to the ranch to give them Quigley’s warning
Q. Quigley returns to the cave and finds Cora and the baby alive. As they ride back to town, Cora simply refers to Quigley as “you”
P. A heartbroken Cora has to give up the baby she loves to a group of aborigines
O. Quigley doesn’t wake Cora before he leaves, but she awakens on her own
N. Quigley turns around as he rides away from Cora to acknowledge her
M. Marston’s man asks about a reward and is told to wear Marston’s coat and hat at the front gate
L. One of Marston’s men happens upon Quigley and gets killed
K. Horse with no rider comes to Marston’s ranch with a note from Quigley
J. Marston drenches a man in water to stop him from sleeping. Three of Marston’s men run off in the night to save themselves
I. Quigley kills two of Marston’s men in one shot from his rifle
H. Marston’s gunmen take Quigley by surprise
G. Marston’s men drag Quigley to Marston’s ranch
F. Quigley shoots Marston, showing his superior skills with a revolver
E. Quigley accepts the offer of his rifle from Marston’s aborigine servant
D. Quigley is confronted by the major for the last time and gets saved by aborigines
C. After Quigley bandages his leg, he discovers he’s been left alone by the aborigines
B. Quigley sees Cora and calls himself Roy, which prevents a gunfight
A. Quigley prepares to leave Australia with Cora
Now that we’ve gotten a high-level view of the chiasmus, let’s go down under and back up above to see how Quigley Down Under unfolds perfectly.
A. Entering and Leaving Australia

At the start of the film, Matthew Quigley suits up and packs his belongings in preparation to board a ship that will take him from America to Australia. As he’s about to get off the ship, a man behind him gets angry at an elderly woman for taking a long time to disembark after their lengthy journey. Quigley silences him with a swift hit in the groin with the butt of his rifle.
At the end of the film, Quigley and Cora walk slowly to the ship that will take them back home to America from Australia. On the way, he’s stunned into silence when she finally calls him unironically by his right name. He puts down all of the stuff he was carrying and does something he’s wanted to do for a long time. He kisses her.
B. Roy
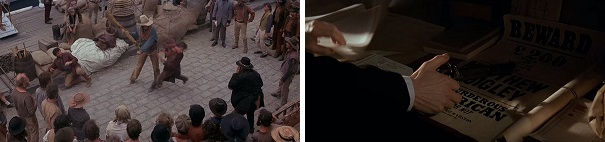
At the dock, Quigley finds a woman nicknamed Crazy Cora being accosted by a group of ruffians. She refers to him as Roy even though they’ve never met before, and he gets into a big fistfight with the men in order to defend her from them. She keeps referring to him as Roy until he finally corrects her by noting that his name is Matthew Quigley. This makes the ruffians realize he’s the one they’ve been looking for in order to bring him to his final destination.
At a ticket office, Quigley asks to pay for a boat ride back to America. The ticket seller has a Wanted poster for Matthew Quigley behind his desk, hidden from Quigley’s view. When he asks for the stranger’s name, Quigley looks out and sees Cora for the first time in quite a while, and the sight of her inspires him to identify himself as Roy Cobb. This persuades the ticket seller that he isn’t the man the law is looking for and spares Quigley a potential gunfight.
C. Left Alone

At night, Cora tries to bandage Quigley’s head to make up for hitting him with an oar during the fight earlier. He refuses her help and demands she leave him alone. She saunters away, but still waves to him, and he half-heartedly acknowledges her attempt at kindness.
After he’s safe, Quigley pulls off his bandana and uses it to bandage the gunshot wound on his leg. While he’s focused on that, he doesn’t notice that all of the aborigines who were just on the hills around him disappeared and left him alone, not waiting for him to acknowledge their kind act.
D. Major Trouble

Marston’s men quietly prepare for a potential confrontation with Major Ashley-Pitt and his British soldiers. They are looking for some AWOL officers, but they haven’t been able to track them down yet. The major speaks with Quigley briefly, and then continues on his way without a fight.
After killing Marston and his men, Quigley is confronted by the major one more time. He’s come specifically to arrest or kill Quigley. The soldiers point their guns at him, and he exchanges a few words with the major. But the major and his men leave in peace when they suddenly find themselves surrounded and outnumbered by aborigines.
E. Offers Declined and Accepted
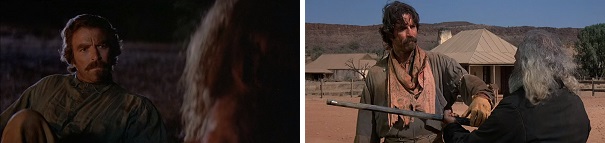
Quigley stares off into the dark wilderness one night and gets interrupted by Cora. She offers her body to him, but he declines the offer and walks away from her in a hurry.
Quigley turns in time to see Marston’s aborigine servant walking up to offer him his rifle, which he accepts. Then the servant and his fellow aborigines strip their clothes off and leave Marston’s ranch to reunite with their people.
F. Quigley vs. Marston

Quigley meets Elliott Marston at his ranch, and Quigley shows off his marksmanship by easily hitting a far-off bucket three times with his rifle. Marston hires him on the spot. Then he proceeds to show off his own skills with a revolver by shooting the two AWOL officers the major was looking for when they reach for guns. Over dinner, Quigley notes that he never had much use for Marston’s favorite type of revolver.
When Quigley meets Marston for the last time, they prepare to duel to see who’s quicker on the draw with revolvers. Marston fires him, and then Quigley proceeds to kill Marston and his two men with one shot each. Marston thought that he would have an advantage over Quigley because he was unfamiliar with a revolver. But Quigley tells Marston before he dies that he said he never had much use for one, not that he didn’t know how to use one.
G. Kicked Out and Dragged Back

When Quigley asks Marston why he invited him to travel around the world to take a seemingly simple job of shooting wild animals, Marston reveals the real reason. He believes aborigines are too dangerous to leave alone, but they are too good at staying out of rifle range. So he wants Quigley to shoot them. Quigley doesn’t utter a word, but refuses by violently throwing Marston out of his own house.
Later, Martson’s men tie Quigley to the back of a horse and drag him back to Marston’s ranch. Once the battered cowboy comes to a rest, Marston confronts him and acts as though their conversation was just interrupted, and he’s eager to continue where they left off. Quigley is in too much pain to respond verbally, though.
H. Surprising Quigley

Quigley turns out the lights and prepares for a seemingly epic gunfight against Marston’s men. But Marston’s aborigine servant surprises him and knocks him out, ending the fight before it can begin. The men then beat him senseless.
Several of Marston’s men do something unexpected and ride straight out to Quigley’s position on a hill and engage in an epic gunfight. When Quigley thinks he has the upper hand, one of Marston’s young gunmen shoots his leg and prevents him from getting to his rifle, suddenly ending the conflict.
I. Two Die Fast

Two of Marston’s men cart an unconscious Quigley and Cora far away from Marston’s ranch and unceremoniously dump them in the Australian outback to die. But Quigley manages to get his rifle back by stabbing one of them, and then he uses it to shoot the other as he tries to get away.
Early in the morning, Marston’s men gather in the ranch, and Quigley unceremoniously shoots two of them in one shot from long range after they lined up in his sights. The rest of the men hunker down and try to decide how to deal with Quigley.
J. Running for Their Lives

Stranded in the outback and struggling to survive, Quigley and Cora wander aimlessly in search of water to avoid dying of thirst. They eventually collapse and wait to breathe their last.
Struggling to stay awake all night, Marston’s men try to stay alert. Marston soaks one man in water to prevent him from dozing off. They discover three of their own escaped during the night to try to save their lives because Quigley is coming to kill them all otherwise.
K. Ominous Message

The major rides to Marston’s ranch with two dead bodies in tow. Marston hopes they are the bodies of Quigley and Cora, but he is proven wrong when the major reveals their faces, indicating they are the men Quigley stabbed and shot. It sends a message that the man and woman may still be alive.
A horse comes riding at full speed to Marston’s ranch. Marston hopes it’s one of his men coming to report he’s killed Quigley, but he is disappointed because the horse has no rider. Quigley attached a note to the horse, warning the men that he’ll allow most of them to leave safely that night, but the rest will face his wrath.
L. Finding Quigley

Aborigines stumble upon Quigley and Cora in the outback. They carry their nearly lifeless bodies to a special place to help them recover from their injuries and avoid dying from dehydration and hunger. They even let Quigley keep his rifle.
Marston sends out a number of men to search for Quigley, and one stumbles upon him as he rides up a hill. Quigley ends his life in quick order as, far away, Marston empties his revolver by shooting it randomly into the air.
M. Rewards

Not wearing his usual outer shirt, Quigley spends time with aborigines learning their ways and sharing his own skills with them in gratitude for saving his life. He even lets one of them wear his cowboy hat.
Marston demands to know which of his men asked about the reward he’d put on Quigley’s head. He then tells that man to wear his hat and coat and guard the front gate.
N. He Never Looked Back
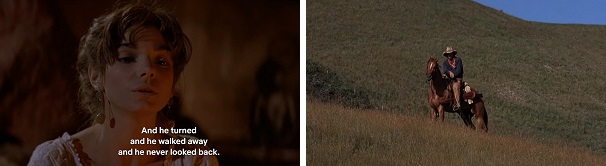
Cora shares the sad tale of how she ended up alone in Australia. She accidentally smothered her son in a panic to try to save her own life from a frightening group of Comanches. Her husband barely spoke a word to her, but simply put her on a boat and walked away without turning back to look at her.
Quigley prepares to leave Cora after arranging for her to be taken care of. As he rides away, he stops and looks back at her. He does that not only because he remembered what she said, but also because she had redeemed herself by refusing to smother an aborigine baby when her life was in peril from a pack of ravenous dingoes.
O. Leaving While Cora Sleeps

Cora wakes up early one morning and discovers that Quigley is already awake and that the aborigines they had been with left without saying goodbye. That’s because the aborigines are fleeing while being hunted by Marston’s men.
Quigley wakes up early in the morning and doesn’t wake Cora to tell her he’s leaving to hunt down and kill Marston. However, she wakes up before he departs, so he gives her a somber farewell.
P. Breaking Cora’s Heart

Aborigines engage in a battle with Marston’s men who shoot and kill several of them. Cora charges out to try to defend them while Quigley shoots most of the men and scares the last one off. Cora’s heart breaks at the sight of a little aborigine girl she loved lying dead on the battlefield.
Cora battles with herself whether or not to give up an aborigine baby to a group of aborigines who’ve come to take him in their charge. Quigley goes out to speak with the aborigines, and he is soon followed by Cora who delivers the baby to them. It breaks her heart to do so.
Q. What’s My Name?

Cora tries to coax Quigley into sharing the blanket with her one night, but he refuses after she continues calling him Roy. The next day he asks her what his name is, and she angrily responds “Matthew Quigley, same as any other day.” He then invites her to strip naked and make love, but she takes umbrage as if she hadn’t suggested that earlier.
Quigley returns to the cave where he had left Cora and the baby, and he is relieved to find them both alive and well. He gives her a new dress she had asked for to put on instead of her ragged one. On their way back to town, he asks her what his name is, and she doesn’t say Roy or Matthew Quigley, but simply, “You.”
R. Harbinger of Doom

The lone survivor of Quigley’s long-range attack makes it back to Marston’s ranch. He tells Marston the tale of what happened, giving him a sense of dread about how far Quigley can hit a target from.
The lone survivor of another encounter with Quigley arrives at Marston’s ranch with a warning that Quigley is coming. Marston puts on a brave face, but he’s clearly worried about it.
S. Falling

Quigley and Cora are horrified when they see Marston’s men corralling aborigines to a ledge overlooking a canyon and then forcing them to fall to their deaths. Quigley shoots several of the men, including one on a horse making him and his horse fall off the cliff.
Quigley is horrified at the sight of the kind wife of a helpful store owner. She was accidentally shot and killed by Marston’s men while they were trying to kill Quigley. He knocks the sole survivor off his horse and demands he go tell Marston his fall is coming.
T. Dead and Wounded

Quigley wounds one of Marston’s men as he’s fleeing so he can wring information from him before allowing him to die. He hands the crippled man a revolver with one bullet, and the man points it at Quigley but ultimately uses it on himself to avoid an even worse death. Meanwhile, Cora runs to the dead aborigines in the valley and weeps over them.
Quigley engages in a long battle with three of Marston’s men. In the end, he kills two of them and tells the third not to go for a hidden belly gun while he’s pretending to surrender. The man doesn’t listen to Quigley and goes for it, so Quigley shoots him in the leg. Meanwhile, a man and his son are mourning over the death of their wife/mother.
U. Crying Baby

Cora hears the report of the gunshot the wounded man fired on the cliff above her. She then finds an aborigine baby among the dead who miraculously managed to survive his fall off the cliff. He’s crying loudly, and Cora quickly scoops him up and tenderly cradles him as Quigley appears above her.
Later, Cora desperately tries to stop the baby’s noisy cries, nearly smothering him to death. But he removes her hand from his mouth, and she snaps out of her panic. She summons the courage to defend him alone. As hungry dingoes bear down on her, she unloads a barrage of bullets on them.
V. Be Back Soon

Quigley and Cora consider their options of getting help as quickly as possible. In the end, she encourages him to go by himself because she can take care of the baby for one night in a cave. When he raises a doubt of his return, she loudly proclaims, “You’ll be back!”
That night, Cora’s worst fears come true. She hears the baby crying inside the cave and she tries to pacify him by saying, “Daddy will be home soon.” Dingoes also hear the baby’s cries and they come running. Her first instinct is to try to get the baby to be quiet.
W. Quigley’s Horse

The turning point comes when Quigley rides one of Marston’s horses hard for a whole day, entering a small town at night. A friendly general store owner and his wife give him ample assistance, and Quigley even lets their son, Klaus, hold his rifle. The owner tells Klaus to go get Quigley’s horse.
A couple of Marston’s men stumble out of a saloon in that same town and see Klaus leading Quigley’s horse as he was told to do. They recognize it as one of Marston’s, and they aggressively grab the boy from behind and demand he tell them where it came from.
The significance of this moment as the turning point of the film’s chiasmus is that it demonstrates the contrast between the hero and villains in a quiet moment in between spectacular action sequences. Quigley has to ride his horse for a long time to make it into town at great personal peril. When he arrives, he doesn’t demand anything from the store owner and his family. In fact, he doesn’t want to impose too much on their hospitality. They are simply eager to help him, and he has to convince them to take payment in return. He even lets the boy Klaus hold his rifle for a moment as a gesture of goodwill.
On the other hand, Marston’s men drunkenly stumble out of a saloon, showing a blatant disregard for personal safety. When they see Klaus leading a horse they recognize, their first instinct isn’t to walk up and politely ask him where he got it from. They rush over to accost him and stop him from crying for help. Then they command him to divulge the information they want. The difference between them and Quigley couldn’t be clearer, and it only becomes more dramatic during their gunfight with Quigley.
Long-Distance View of Greatness
Incredible, isn’t it? A great movie like Quigley Down Under just became even greater now that we can see the beautifully symmetrical story structure the filmmakers managed to achieve in it. I really need to acknowledge how amazing it is that I keep finding examples of Cinematic Chiasmus. It’s not even that I find them per se, but every time I get a feeling about a movie, it turns out to be a chiasmus.
Like how Quigley is able to shoot tiny targets from a long distance, we can now look at Quigley Down Under from a distance and spot all the subtle ways its events match up perfectly to create a chiasmus.
This is the Deja Reviewer bidding you farewell until we meet again.
All images are the copyright of their owner.
Want to Support the Deja Reviewer?
If you’d like to support the Deja Reviewer, please consider donating a few dollars to keep this site going strong. I’ll even send you an original joke if you do! Try it, and prepare to enjoy a good chuckle.
$5.00


Pingback: Quigley Down Under’s Villain Isn’t Such a Bad Guy | Deja Reviewer
Pingback: Whoso Discovereth The Sword in the Stone’s Chiasmus Is King | Deja Reviewer
Pingback: I Didn’t Realize People Thought So Poorly of Back to the Future Part III | Deja Reviewer
Pingback: 60 Examples of Cinematic Chiasmus | Deja Reviewer